Image to Video AI: How to Turn a Photo Into a Usable Clip

In this story

Image to video AI turns a still photo or illustration into a short moving clip. Upload an image, describe the movement, choose the available duration and format, then generate and review the result. The image supplies the starting look; the model invents what happens next.
For a first project, start with one clear subject and one gentle camera move. Canva suits a quick social design, Adobe Firefly offers first- and last-frame guidance, and Runway provides model-specific controls for more deliberate shots. Choose by the workflow and export limits you need, rather than a promise of perfect results from any photo.
What image to video AI actually does
An image-to-video generator creates new frames guided by your source image and, usually, a motion prompt. It can make fabric ripple, animate an illustration, or suggest a camera moving through a scene. That differs from placing a photo on a video timeline and applying a pan or zoom, which keeps the underlying image intact.
The distinction matters for product photos, family portraits, and historical images. Generated movement is an interpretation, not recovered footage of a real event. A convincing head turn does not establish what that person actually did or what the hidden side of their face looked like.
Use generative animation when some invention is acceptable. If every letter on a package or every facial detail must remain exact, a conventional crop-and-zoom animation may be the better choice. Add essential titles and logos in the editor after generation so they remain under your control.
Related posts:
10 Best AI Agents for Customer Support in 2026
Best AI Voice Agents in 2026
Best AI Photo Editing Tools 2026
Best Free AI Image Generators in 2026
Which AI image-to-video generator should you use?
The following shortlist compares documented features, not results from our own hands-on testing. Features and allowances were checked in October 2026; confirm the selected model and export screen before paying.
Your priority | Tool to consider | Useful control or limitation |
A quick clip inside a social design | Canva | Smart or Custom image animation; its guide describes a three-second clip that you can edit with text and audio. |
Guiding a shot between two images | Adobe Firefly | Upload a first frame and an optional last frame; available settings depend on the model. |
Choosing duration and directing motion | Runway Gen-4.5 | Two- to ten-second clips, 720p output, and several image-to-video aspect ratios; requires Standard or higher. |
Trying character movement on a free allowance | Viggle | The Video tool accepts prompts; Mix uses a motion reference. Free exports have a watermark. |
Canva’s workflow keeps generation within a design you can finish and share. Firefly’s image-to-video guide explains first- and last-frame uploads. Those endpoints guide a transition; they do not guarantee that every intermediate frame will preserve the subject perfectly.
Runway’s model details and costs appear in the budget example below. For movement copied from a reference clip, Viggle distinguishes its Mix workflow from its prompt-based Video tool. Choose the mode that matches the job: animating a scene and making a character perform a specific motion are different tasks.
Also distinguish the platform from the model. A platform may offer several video models, each with different duration, audio, resolution, and credit requirements. A feature advertised somewhere on the site may not apply to your selected model. For broader subscription comparisons, What the tech’s AI comparison tool includes photo-to-video and video-editing capabilities.
How to turn a photo into an AI video
1. Define one shot before uploading
Write down the clip’s job: “a five-second opening shot for a coffee shop Reel” is more useful than “make this cinematic.” Decide what should move, what must stay recognizable, and where the shot will end.
If the clip belongs in a longer video, plan the surrounding shots first. Use our video script template to place it beside the hook, narration, and next scene. A beautiful animation can still be unusable if it leaves no room for the headline or contradicts the voiceover.
2. Prepare the source image
Choose a sharp image with a readable subject and clean edges. Inspect faces, fingers, reflections, and small lettering before uploading. Runway’s image-to-video prompting guide notes that existing visual artifacts can become more pronounced in motion.
Crop for the intended output: 9:16 is vertical, 16:9 is widescreen, and 1:1 is square. Leave room around the subject for the requested movement. A cup already touching the edge of a vertical crop gives a push-in little room before the handle disappears.
Keep the original untouched and export a separate working copy. For a large source library, our guide to organizing photos on a Mac helps separate originals, selected images, and exports.
3. Describe movement rather than repeating the picture
Start with this simple pattern: camera movement + subject action + pace or ending. You do not need every element in every prompt. A still subject with a moving camera is enough for a first draft.
Instead of “a beautiful white coffee cup on a rustic wooden table,” try: “The camera slowly pushes toward the cup. The cup and saucer remain still. One continuous shot.” The uploaded image already supplies the cup’s appearance and setting.
For a portrait, a restrained starting prompt might be: “Locked camera. The person gives a small, natural smile, then holds the expression.” Get permission before animating someone’s likeness, and avoid implying they said or did something they did not.
4. Generate a short draft and inspect it
Use the shortest duration that fits the action. Confirm the crop, model, credit charge, and any audio setting before generating. A short clip gives you less footage to inspect and can reduce the cost of an unsuccessful attempt when billing depends on duration.
Play the draft at normal speed, then pause near the beginning, middle, and end. Check whether the subject’s outline changes, objects merge, text mutates, or the background appears to slide independently. Review audio separately when the selected model generates it; silent output is not necessarily a failed generation.
Change one instruction at a time so you can tell what helped. If two focused revisions still damage an essential detail, simplify the shot or use an editor-based animation instead of repeatedly spending credits on the same idea.
5. Finish the clip in an editor
Trim the usable section, add accurate captions and branding, and adjust sound levels. Watch the actual downloaded file, not just the preview, before publishing. Check that its aspect ratio, visible watermark, and resolution suit its destination.
For a longer piece, combine several short shots rather than asking one generation to perform a complete sequence of unrelated actions. Keep notes on the source image, model, settings, and prompt for each shot so revisions are manageable.
A worked example: animate a coffee photo
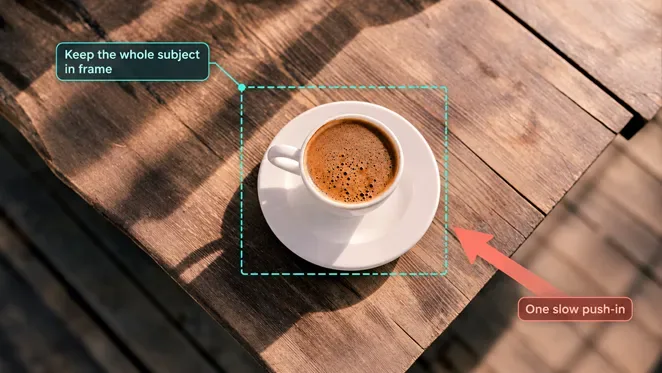
Suppose you want a five-second social clip from the coffee photo above. The job is to draw attention to the cup while leaving space for a headline added later.
First draft prompt: “The camera makes a very slow push toward the coffee cup. The cup and saucer remain stationary. One continuous shot with steady daylight.”
Pass conditions: The handle stays attached and in frame; the cup’s rim remains round; the saucer keeps its shape; and the wood grain moves consistently with the camera. These are review criteria, not claims that the prompt has been tested or will always work.
If the geometry changes: Reduce the camera movement. If the cup still warps, keep the photo static and create a slow zoom in a conventional editor. For this assignment, preserving the product matters more than adding complex motion.
Once the basic shot works, you could try a separate version with subtle steam. Treat that as invented atmosphere: the source photo does not prove the drink was visibly steaming. Avoid adding a cup rotation unless you are comfortable with the model inventing the unseen surfaces.
Free image-to-video AI: budget for usable clips
“Free” can mean a one-time credit deposit, a daily allowance, or a watermarked trial. It does not automatically mean unlimited downloads, commercial permission, or access to every model.
Viggle currently advertises five free five-second videos per day, with watermarked exports. Runway’s Free plan includes a one-time 125-credit deposit, but that does not unlock Gen-4.5, which requires Standard or higher. Check access and credit balance separately.
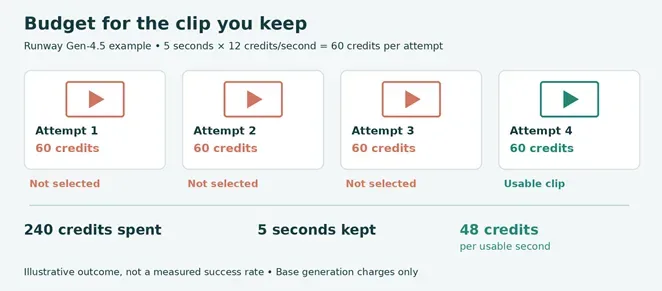
For a concrete paid-model example, Runway lists Gen-4.5 at 12 credits per second. A five-second generation therefore costs 60 base credits. Its credit documentation confirms the free deposit and explains that app credits and API credits are separate.
If it takes four attempts to get one usable five-second clip, you spend 4 × 60 = 240 credits. That is 48 credits per usable second, even though the advertised generation rate is 12 credits per second. This is a planning example, not a measured success rate.
Compare services by the cost of an acceptable export. Before subscribing, check the allowance, model access, watermark, download resolution, commercial-use terms, and whether unused credits expire. Save a copy of the relevant terms for client work. An “unlimited” plan may still limit specific models, processing modes, or queue speed.
Fix common photo-to-video problems
What goes wrong | First change to try | When to change approach |
A face, hand, or product changes shape | Reduce movement and remove extra actions; inspect the source for defects. | Use a static image or conventional animation if identity or geometry must be exact. |
Lettering or a logo changes | Generate a clean background shot and add verified text in the editor. | Keep the original package photo visible if its printed details are essential. |
The subject leaves the frame | Widen the starting crop or request less camera movement. | Redesign the shot if the required output crop cannot contain the action. |
The camera orbits when you wanted stillness | Ask for a locked camera and simplify the scene’s action. | Use an editor if precise framing remains unreliable. |
The clip cuts before the action finishes | Reduce the action or select a longer supported duration. | Split the sequence into separate shots. |
Upscaling should come after this review. More pixels do not make an incorrect logo, extra finger, or changing product shape acceptable. Fix the content first, then decide whether a higher-resolution export is worth the additional cost.
Check rights and privacy before publishing
Use an image you own or have permission to upload, modify, and use for the intended purpose. Check the generator’s terms for the specific plan and model, plus any separate restrictions on the source image, music, voice, or likeness. A paid account is not blanket clearance for third-party material.
Adobe’s partner-model guidance says users are responsible for deciding whether a model is appropriate for their project. Do not assume every model inside the same app has identical protections. For confidential product photos or client portraits, review upload retention and sharing settings before sending the files.
Describe generated motion honestly where viewers could mistake it for evidence of a real event. Keep the original image and finished edit so you can explain what changed. Start with one short, modest shot, inspect the details, and expand the sequence only after the first clip meets its purpose.
Keep reading


How to Get Your Business on ChatGPT
Claim or add your business in ChatGPT Business Hub, complete verification, and use Insights to see how customers discover your business.

How Quantum Dots Turn Size Into Color
Quantum dots are tiny regions of semiconductor that confine electrons in all three dimensions. In a TV, they typically take the form of nanocrystals just a few...

Organoid Intelligence Explained
Organoid intelligence is a field of research that connects lab-grown neural tissue to electronics and software. Researchers use the resulting systems to study h...